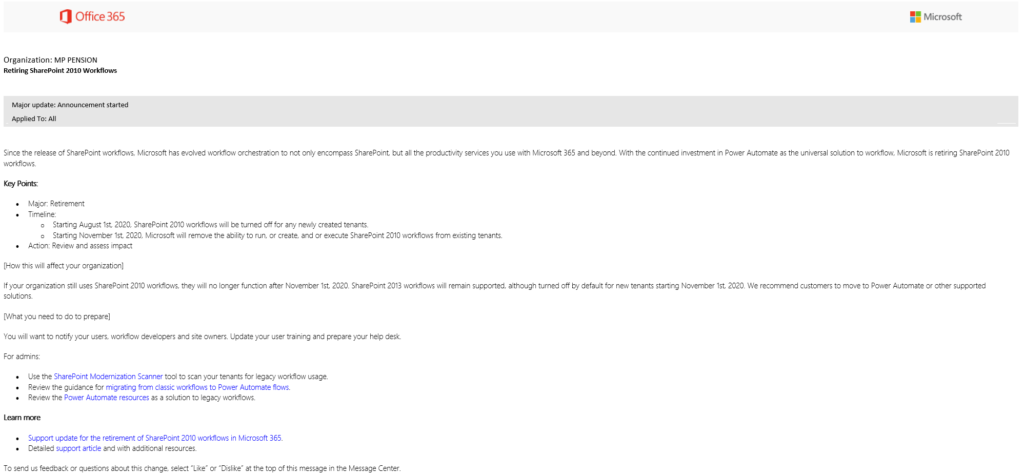
Starting August 1st, 2020 Microsoft will turn off ability for creating or running SharePoint 2010 workflows in Microsoft 365.
As from November 1st, 2020 all tenants will be affected by this change. Meaning that you will no longer be able to run your SharePoint 2010 workflows on your Microsoft 365 tenant. Below is the official statement from Microsoft:
Please also note, that support of running SharePoint 2013 workflows on new tenants, will also end in November 2020. Meaning the ability to run these workflows may also end in near future.
How am I affected by this?
Well, if you have always worked in the new modern way of using SharePoint and have already converted your flows to Power Automate flows, you do not have to worry.
This change will probably (yes, read probably), only affect SharePoint sites that are running in classic mode.
If you have been migrating your SharePoint sites from an On-Premises version of SharePoint to SharePoint Online, there could be a potential risk that your sites are running SharePoint 2010 workflows. So, start looking for workflows running at your SharePoint sites that are running in Classic mode. For any standard SharePoint workflows, 2010 or 2013 based, you should start converting them now.
Please note, this change is only affecting workflows running in SharePoint Online.
Other Notes
Although I have not seen any announcement regarding the retirement of classic sites support and Task lists. You may want to look at your classic sites for the use of “Task” lists. If you have task lists that has the “e-mail notification” setting enabled, this may also be affected by the retirement of SharePoint workflows. The same may also apply to standard SharePoint approval flows as they all seem to rely on this feature.
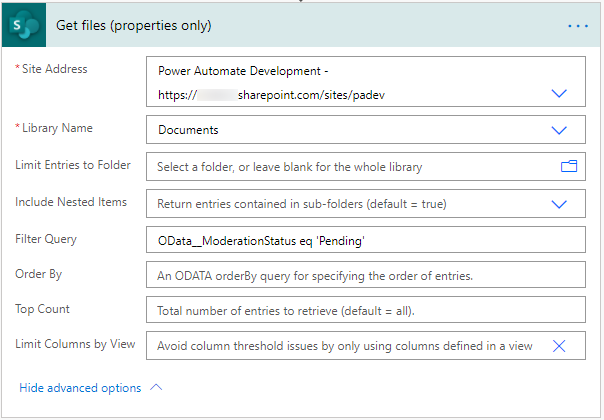
I had a task where I needed to get the current content approval status from documents in a SharePoint Online document library. This as such is no big deal while the “Get files properties only” action can give you that information very simple.
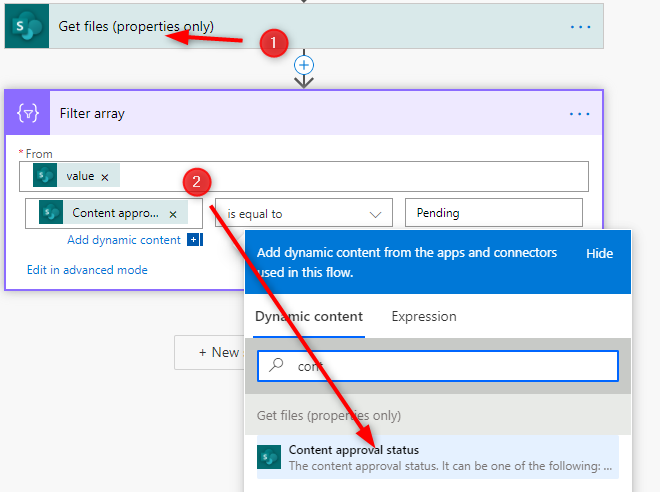
The easy way is to just add the “Get files (properties only)” action and a “Filter array” action or a “Condition” action on the result and your are good to go:
In my case that did not quite solve my problem. To be more effective I wanted to filter out all pending approvals only in my “Get files (properties only)” action. No need to parse all other documents.
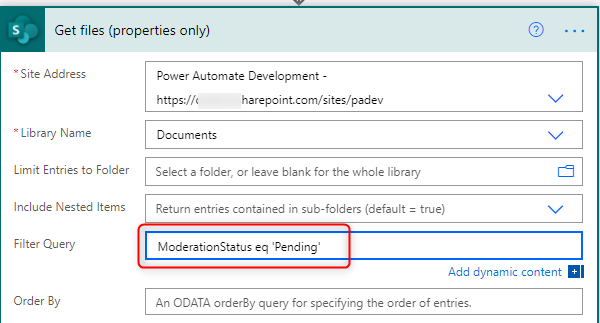
And this is where things got a bit complicated, and then again quite simple. If you look at the result from the “Get files (properties only)”, it has a json structure like the below where the “Content approval status” field is found as “ModerationStatus” which looks like the SharePoint internal name for “Approval status”:
Ok, so let’s try inserting this into the “Filter Query” of the “Get files (properties only)” action…
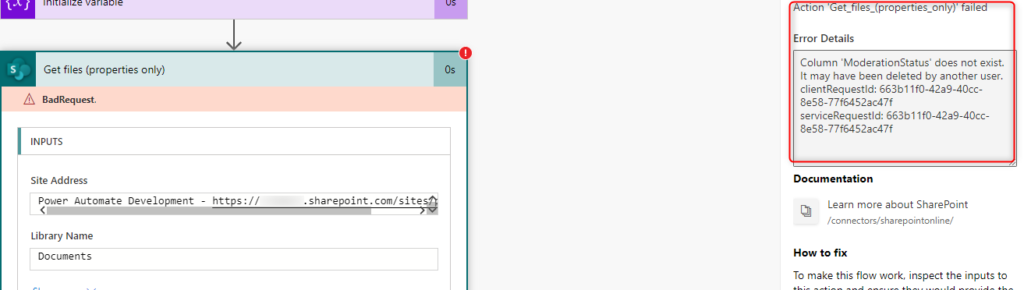
Result: Error “Column ‘ModerationStatus’ does not exist”…
Alright Power Automate, what is wrong here? Well, you need to look deeper into SharePoint, this is where the root cause is. The ‘ModerationStatus’ field has an internal name of ”OData__ModerationStatus” and this is the name you need to use (please note the name is spelled with double underscore)…
This is not logic while Power Automate actually translates the “Approval status” field into “ModerationStatus” when being used in Power Automate expressions.
In my job I have already created several flows in MS Power Automate. Although I am familiar with the way flows are built and published, I am still frustrated about the way that flows are handled in Microsoft 365.
Back in the days (which is not so far ago) we created all our flows as SharePoint workflows or through products like Nintex, K2 etc.. Either you created your workflows directly in SharePoint (through SharePoint designer) or you paid for an additional product to administrate your workflows. Pretty simple model.
When Microsoft introduced MS Flow (now MS Power Automate), they introduced the product as service for all users: “Hey, it’s so simple to create flows, no coding, you can all create flows easily”. Yes, almost true. But Microsoft forgot to inform users about the way that flow really works – especially about the flow life cycle.
If you are used to create SharePoint flows in the traditional way. You know that publishing a workflow will apply to all users, and that the flow will continue to live even if the flow editor account is disabled or deleted (let’s say the user leaves the company). This though, is not always the case in MS Power Automate flows.
Let’s pick an example:
User A creates a flow in Power Automate for a SharePoint list to handle permissions for items (e.g. contracts) when they change value in a metadata “Status” field.
The workflow is created and published by user A, and it is changing permissions for the current item whenever any user is changing value in the “Status” field. Great! Happy camper.
… in the meantime, user A is leaving the company to pursue new challenges, so the IT dept. de-activates the account for user A and removes all his Office 365 assigned licenses. After a period they decide to delete the Azure AD account completely (OK, this may not happen in the real world, but it is seen though). Can you imagine what happens to the flow in this scenario? The flow is gone!
In the above scenario the consequences can be very damaging to the business process. All users with access to the solution where relying on the configuration of the flow that user A created. This is just a simple scenario for a simple workflow and it could have even bigger impact if the flow was very complicated and had several connectors (e.g. connections to Outlook/Exchange in context of user A, etc.).
The solution
Ok, so what can you actually do to get avoid the critical situation above. Well, it’s a matter of governance and discipline. Because, you can actually avoid flows created by users from disappearing out in the air (or cloud if you prefer) if you follow some basic rules:
Always add more than one owner to your Power Automate flows (see instructions below).
Train and educate your Power Automate flow users.
Create a strict governance/policy about the use of Power Automate flows.
Adding additional owners to a MS Flow
Adding additional owners to your personal Power Automate flow prevents the flow from disappearing when your user account is disabled/deleted. When adding additional owners to your personal flow it turns into a “Team” flow.
Example:
The following flow is already created as a personal flow:
… as you can see it appears as under the view “My flows”. Now, in order to change the flow settings you need to access the flow properties and add an additional owner (click on “Edit” in the “Owners” section)…
You can now start adding additional owners to your flow in order to ensure that ownership is no longer tied to your personal account…
Important! The result is that your flow is now turned into a “Team” flow and is no longer displayed in “My flows”. Instead it will appear in the “Teams flows” view…
OK, so this flow ownership thing is great, but there is one thing that you need to be aware about. Even though you can add multiple owners to a flow, your flow may still be using connections in context of the original user.
Example:
Your flow is configured with a connection to SharePoint / Exchange or something similar (which is very likely)…
Whatever this connections is, the connection is by default tied to the user that created the flow. And that’s also the case when adding new owners to the flow. If you add a new owner to the flow, you will also see this message…
Adding multiple users does not really solve the issue with the flow being fully functional after the original user’s termination. Why? Because the connections in the flow are no longer valid! The flow simply cannot connect to something in context of a user that no longer exists.
I cannot think of a real solution for this. The only thing I can suggest is that you ensure that the connections you create in your flows always are tied to an active Microsoft 365 account. Using some kind of system account may be the solution. But, if you create solutions that require a lot of workflow runs, you may be hitting the account’s limit of free workflow runs. Make sure you are always aligned with Microsoft’s licensing model for flows: https://emea.flow.microsoft.com/en-us/pricing/
So why even add additional owners?
Adding multiple owners to your flow is still very much recommended. By adding multiple owners you ensure that your flow continues to live, even after the original author’s termination. But make sure your flow’s connections are always active, otherwise the flow may not run the in the expected behaviour.
Ok, so you have already built several Power Automate workflows to support various business processes. And during your development, you also found the need for using conditions. You have even used several condition steps in the very beginning of your workflow to determine if you should continue the remaining processes of your workflow, or terminate it.
Did you know that, in about August, 2019, Microsoft released a new way of handling conditions in your trigger settings, that can let you skip your workflow process before the process is even started?
In this post I will give you some tips on how you can use these new trigger settings.
The “old” way
Let’s start with an old example. Just to explain how we used to do it.
In the below example we have created a Power Automate flow with a standard trigger and set a condition which checks if a certain value is true. If the condition is met, the flow should continue to run it’s actions. If not, the flow should exit immediately (terminate). This process requires about 3 actions from the flow…
The old fashion way….
Using Trigger Conditions – The new way
With Trigger Conditions you now have a new option in your trigger settings which can be used to accomplish the same as the above, but in a more simple way. The difference is that the workflow will not figure as being executed in the flow history list unless the trigger condition is met (ok, yes it will, but it will be hidden – I will explain in the bottom of this post).
Another benefit, is that when a flow is “skipped”, it will not count on your user’s limited flow run quota.
This option is now available for most of the standard Triggers in Power Automate flows.
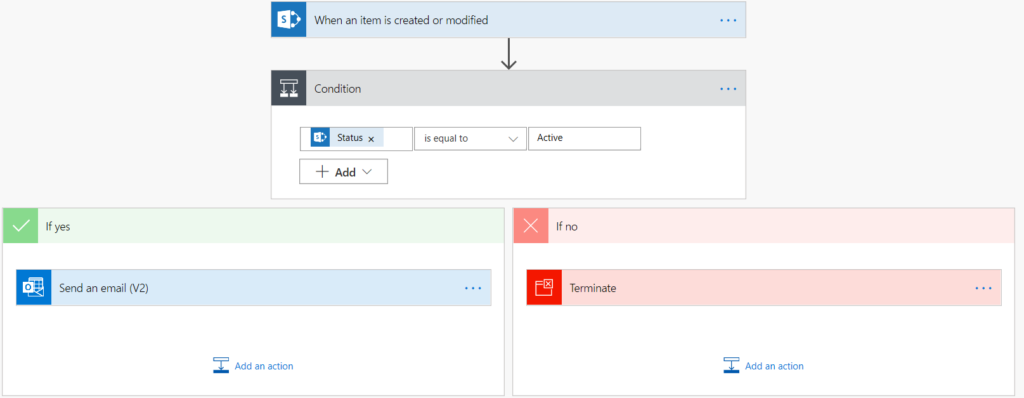
While having a new “Automated” flow created with a standard trigger (like the “When an item is created or modified”), you can now open the settings for the trigger and find the “Trigger Conditions” option…
In the below example I have configured the “Trigger Conditions” settings, so that the flow should only execute if an item’s “Status” field is set to “Active” in a SharePoint list…
The result, when executing the flow with the above settings, is that the flow will only execute if the above conditions are met (the value of the “Status” field is set to “Active”). In any other situations, the execution will be skipped.
How to find the value to insert into the trigger conditions
If you
are having a hard time figuring out how to insert the values into your trigger
conditions, the below trick can save you some pains.
Add the workflow action “Get items” and configure it to lookup items in your list (in some cases you can ignore the “Get items” step). Then add a “Filter array” action and configure it as if it was your condition…
When you are done, click on the “Filter array” action’s “Edit in advance mode” link, and there you have the result string to be used in your trigger condition…
Simply copy the above result into your Trigger Condition settings and save the configuration.
How to find skipped workflows
While using Power Automate Flows with Trigger Conditions you will evidently have situations where the flow is triggered but also ignored (skipped), because your Trigger Conditions are not met. So where can you find these skipped Flows? The answer is in the “Flow Runs” – but you need to look at the right place…
In your “Flow Runs” list view click on “All Runs”…
From the “All runs” view click on the view settings and select “Checks (no new data)” option…
You can now see the skipped flow runs.
Note! Although, you are able to see the flow’s skipped runs, you cannot see details about why the flow was skipped – this is definitely an area for improvement by Microsoft!
We use cookies to optimize our website and our service.
Functional
Always active
The technical storage or access is strictly necessary for the legitimate purpose of enabling the use of a specific service explicitly requested by the subscriber or user, or for the sole purpose of carrying out the transmission of a communication over an electronic communications network.
Preferences
The technical storage or access is necessary for the legitimate purpose of storing preferences that are not requested by the subscriber or user.
Statistics
The technical storage or access that is used exclusively for statistical purposes.The technical storage or access that is used exclusively for anonymous statistical purposes. Without a subpoena, voluntary compliance on the part of your Internet Service Provider, or additional records from a third party, information stored or retrieved for this purpose alone cannot usually be used to identify you.
Marketing
The technical storage or access is required to create user profiles to send advertising, or to track the user on a website or across several websites for similar marketing purposes.