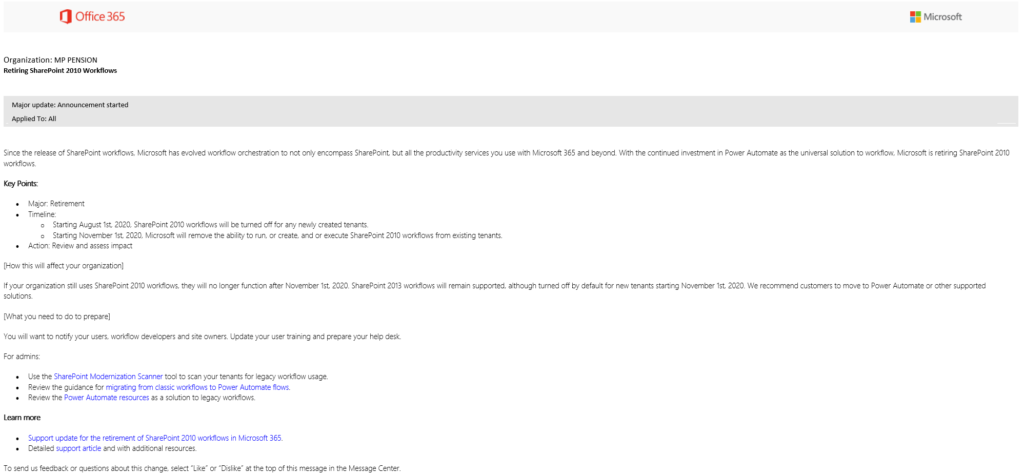
Starting August 1st, 2020 Microsoft will turn off ability for creating or running SharePoint 2010 workflows in Microsoft 365.
As from November 1st, 2020 all tenants will be affected by this change. Meaning that you will no longer be able to run your SharePoint 2010 workflows on your Microsoft 365 tenant. Below is the official statement from Microsoft:
Please also note, that support of running SharePoint 2013 workflows on new tenants, will also end in November 2020. Meaning the ability to run these workflows may also end in near future.
How am I affected by this?
Well, if you have always worked in the new modern way of using SharePoint and have already converted your flows to Power Automate flows, you do not have to worry.
This change will probably (yes, read probably), only affect SharePoint sites that are running in classic mode.
If you have been migrating your SharePoint sites from an On-Premises version of SharePoint to SharePoint Online, there could be a potential risk that your sites are running SharePoint 2010 workflows. So, start looking for workflows running at your SharePoint sites that are running in Classic mode. For any standard SharePoint workflows, 2010 or 2013 based, you should start converting them now.
Please note, this change is only affecting workflows running in SharePoint Online.
Other Notes
Although I have not seen any announcement regarding the retirement of classic sites support and Task lists. You may want to look at your classic sites for the use of “Task” lists. If you have task lists that has the “e-mail notification” setting enabled, this may also be affected by the retirement of SharePoint workflows. The same may also apply to standard SharePoint approval flows as they all seem to rely on this feature.
Yes, this sounds a bit too good to be true. And in fact it is too good to be true. Off course it is not possible to create a complete Intranet in such short time. But then again, you can create a starting point for your Intranet in a very short time.
In this post I will give you some tips about how you, in 10 minutes, can provision an Intranet based site collection in SharePoint Online by using a template from the SharePoint Lookbook.
What to expect
As stated above, you will not get a complete Intranet in 10 minutes. What you will see in this post, is that we can work with some of the official templates that Microsoft provides, as examples, on how you can get started with building your Intranet in SharePoint Online. If you haven’t yet worked with SharePoint based Intranets, this is definitely the place to start.
Get started
All it takes to get started, is that you are a Global Admin of your Microsoft 365 tenant.
Browse the different examples in order to pick the right configuration that suits your needs…
While viewing an example you will see the button “Add to tenant”…
You will now be prompted to logon to your tenant with your Microsoft 365 tenant admin credentials.
Read the consent and click “Accept” if you would like to proceed based on the terms…
In the details page, enter the information about how the new intranet should be provisioned…
When done entering your information, click “Provision”. You will now see the below confirmation box. Before proceeding, please note that it is recommended to wait for the provisioning process to complete before actually open you new SharePoint site…
That’s it! Sit back, take a cup of coffee and wait for your new Intranet based site collection to be provisioned. You will receive a notification on the e-mail address provided in the provisioning step when the site is ready…
The goal of creating a governance is to define roles, responsibilities, polices and processes for how the organization should work in order to achieve it’s goals.
For many organizations the task of defining a governance is often overlooked, and the word “governance” is first mentioned after implementation of the Microsoft 365 platform. By then the business has already started working with all the great new features.
So, is it too late to define you governance then? Absolutely not, it is never too late, but you may need to do more work in order to enforce implementation of the governance if you start out late in the implementation process. Nevertheless you will do yourself a great favor by giving the governance implementation a high priority.
How to get started with Microsoft 365 governance
Before you start defining your Microsoft 365 governance you need to ask yourself a few questions which should help you determine what should be included in the final product.
Here are some examples:
Who are your users?
Administrators
Internal users
External users / partners
Etc.
How are these users working together or as an individual?
Do you have an overview of current and future work processes or do you need to do pre-analysis first?
Which Microsoft 365 services do you plan to implement?
Personal (e.g. Outlook/Exchange, OneDrive)?
Collaboration (e.g. MS Teams, SharePoint, Yammer)?
What is your top 3 priorities for the use of Microsoft 365?
Examples:
Security and compliance
Process improvement
Collaboration
The reason why it is important to go through the above exercise is that it gives you an indication of what needs to be described and how. For example, when you have identified your involved users and their current work processes (you can create uses cases to describe this), you instantly have a baseline for describing, and even improving, how the users should work in the future Microsoft 365 setup.
Remember, the governance definition is also a description of how the users must use the available Microsoft 365 services in certain business scenarios (What tool to use when?). When having that description and implementation in place, you ensure a higher level of compliance and streamlined processes.
While the Microsoft 365 platform involves a lot of available services (suggestion: take a look at the M365 periodic table made by jumpto365.com), you may want to create an overall governance that covers all your selected services. And then split your governance description into sub-areas covering each individual service (e.g. OneDrive, MS Teams, SharePoint) as these may have different settings and policies.
In general it is a matter of describing: Who? When? What? and How?
What to include
There are some common areas that your would normally include in your governance structure. How detailed you would like to describe these areas is up to you, but start out with some simple descriptions – you can always expand at a later time.
A normal governance document would at least include these areas:
Roles and responsibilities – describing who are the actors involved in the implementation of Microsoft 365 and what can they do within each area.
Common use case scenarios – describing the overall business requirements which needs to be solved.
Solution description – a description on how the business requirements must be solved – which Microsoft 365 tool/service when? E.g. for sharing documents with externals you may prefer using SharePoint Online or MS Teams as the primary service. It is always a good exercise to demonstrate how already defined user requirements can be carried out by using a specific Microsoft 365 service.
Security – How is security handled and enforced. E.g. how is identity management and access to data handled.
In modern workplaces we often see that data start to grow in very large scales. For some companies managing large number of data it often becomes a huge challenge to come in control of what data should be retained and what should be deleted.
There could be several reasons for creating a retention policy: e.g. due to legal regulations or internal company polices. But we all have run into situations loosing overview of if our documents were actually deleted as required.
A retention policy defines the rules of:
What data should be retained
How long should data be retained
The retention policy definition in general is quite simple: What should be retained and for how long? But the work to get it defined can be more complex. Therefore you should look into the below sections.
Data classification
To get a well defined retention policy in place you first need to classify your data. You can look at classifications as a way to “Categorize” your data. But classification is more a policy thing than just categorizing content.
Data classification is a standard governance operation which can help you in other situations as well.
By putting your data into classifications, you first of all help yourself creating an overview of what data you actually manage. But secondly you also prepare your solutions for applying sensitivity labels and automated retention which is supported in Microsoft 365.
It is recommended to keep your overall classifications limited to 2 to 3 classification subjects. You could have a requirement to expand this limit. If so, you should consider using retention policies combined with retention labels.
Examples of classifications:
Sensitive – “Sensitive” data often contains personal or business critical content. As a company you often want to protect this data with extra security and retention.
Private – data that is classified as “private” can be used to determine if the content should be protected by certain security policy, but at the same time a retention policy may also apply to this type of data.
Public – data that is classified as “public” usually doesn’t contain sensitive data but a retention policy is often very important because public data often seem to grow fast.
As you can see from the above, you can use classifications for different purposes. Retention policy is just one.
Use the Microsoft 365 built-in retention policies
As a part of your Microsoft 365 governance you should always consider how content should be managed. If you look into the Microsoft 365 product you actually have great options for automating this management through retention policies.
One important thing to remember is that retention policies work different for Microsoft 365 services. Thus, retention for e.g. Outlook/Exchange is different from OneDrive/SharePoint.
You can apply a retention policy for a single service or one policy for all services depending on your requirements.
The following Microsoft 365 services supports retention policies:
Exchange
SharePoint
OneDrive
Microsoft 365 Groups
Skype for Business
Exchange public folders
Teams channel messages
Teams chats
Yammer community messages
Yammer private messages
Combining retention policies with retention labeling
An effective way of automating your retention policies is to apply retention labeling. With labeling you can apply a label to a single document, e-mail or conversation and then ensure the retention policy is met.
Adding retention to your labeling is effective if your want your users (mostly editors) to apply retention themselves. The users often have the knowledge about the data, so they often also know how data should be treated. For example your HR department is more aware of how employee data should be handled rather than your IT support department.
Remember, while retention policies alone can be used to apply automatic retention on a higher level e.g. on SharePoint site collection or mailbox level, labels with retention policies can be applied to single items (documents, mails etc.). When an item is labeled to an item the retention policy applied follows the item if it is moved to another location within your Microsoft 365 tenant. This is not the case for retention policies in general. For more details, see this link.
Configuring your retention policies in Microsoft 365
As mentioned earlier above you can configure your retention policies to target any supported Microsoft 365 service individually or as a global policy.
To start configuring you retention policies in Microsoft 365, look at this article: Link.
Below is a list of links to each service that can be configured:
Is retention policies restricted by Microsoft 365 user license?
Retention policies added tenant wise by a global administrator applies to all users in the tenant regardless of user license. Users with F1, F3, E1 licenses assigned does not have access to manage retention policies in the Microsoft 365 Compliance Center.
Where can I find information about how to create retention policies?
The official documentation from Microsoft can be found here: Link
Can you apply retention labels automatically?
Yes you can – see this article in order to setup automatic retention labels: Link
Is retention labels and retention policies a substitute for Records Management?
No, not really. In fact Records Management is an addition to retention labels where you can add even more features: Link
Can you apply retention based on events?
Yes, you can. Using retention labels, you can trigger retentions based on an event. E.g. if a user leaves the company, the user’s content should be retained for X period of time: Link
Find more information on Microsoft’s official governance documentation dashboard: Link
Today while working with a Power Apps form I ran into an issue where I wanted to display the history of a SharePoint text field in my form.
In SharePoint you can modify your Mulitiple Lines of Text field, so that every time a change is made to the field, the change is appended to a history:
SharePoint field configuration example
The result of the above configuration example will look as the following in the SharePoint list when making changes to the field:
This is what we would like to show in the PowerApps form
So, in my case I wanted to display this complete history in my PowerApps form from in a field called “Description” (in Danish “Beskrivelse”):
The field from which I would like to display all previous entries
To my surprise this was not really possible. I was only able to get the last entry to be displayed in my text field. But this did not resolve my requirement as I would like to display the complete history of appended text, as a kind of documentation of all log entries. Off course I could just look directly into the SharePoint list for this information, but what is the purpose of using Power Apps then?
This solution actually worked out, but having to rely on a Flow in order to resolve a very simple requirement, may be a bit too much. My concern is also that the execution time of the flow may have an impact on the user experience. Imagine what would happen if there is a delay of the flow completion? – which is very likely in Microsoft 365.
My conclusion is, that there is no really good solution for solving this problem until Microsoft provides a fully functional way of displaying the field history in PowerApps. I have seen several User Voice entries where people are asking for this feature. Let’s hope it will be there soon.
In my job I have already created several flows in MS Power Automate. Although I am familiar with the way flows are built and published, I am still frustrated about the way that flows are handled in Microsoft 365.
Back in the days (which is not so far ago) we created all our flows as SharePoint workflows or through products like Nintex, K2 etc.. Either you created your workflows directly in SharePoint (through SharePoint designer) or you paid for an additional product to administrate your workflows. Pretty simple model.
When Microsoft introduced MS Flow (now MS Power Automate), they introduced the product as service for all users: “Hey, it’s so simple to create flows, no coding, you can all create flows easily”. Yes, almost true. But Microsoft forgot to inform users about the way that flow really works – especially about the flow life cycle.
If you are used to create SharePoint flows in the traditional way. You know that publishing a workflow will apply to all users, and that the flow will continue to live even if the flow editor account is disabled or deleted (let’s say the user leaves the company). This though, is not always the case in MS Power Automate flows.
Let’s pick an example:
User A creates a flow in Power Automate for a SharePoint list to handle permissions for items (e.g. contracts) when they change value in a metadata “Status” field.
The workflow is created and published by user A, and it is changing permissions for the current item whenever any user is changing value in the “Status” field. Great! Happy camper.
… in the meantime, user A is leaving the company to pursue new challenges, so the IT dept. de-activates the account for user A and removes all his Office 365 assigned licenses. After a period they decide to delete the Azure AD account completely (OK, this may not happen in the real world, but it is seen though). Can you imagine what happens to the flow in this scenario? The flow is gone!
In the above scenario the consequences can be very damaging to the business process. All users with access to the solution where relying on the configuration of the flow that user A created. This is just a simple scenario for a simple workflow and it could have even bigger impact if the flow was very complicated and had several connectors (e.g. connections to Outlook/Exchange in context of user A, etc.).
The solution
Ok, so what can you actually do to get avoid the critical situation above. Well, it’s a matter of governance and discipline. Because, you can actually avoid flows created by users from disappearing out in the air (or cloud if you prefer) if you follow some basic rules:
Always add more than one owner to your Power Automate flows (see instructions below).
Train and educate your Power Automate flow users.
Create a strict governance/policy about the use of Power Automate flows.
Adding additional owners to a MS Flow
Adding additional owners to your personal Power Automate flow prevents the flow from disappearing when your user account is disabled/deleted. When adding additional owners to your personal flow it turns into a “Team” flow.
Example:
The following flow is already created as a personal flow:
… as you can see it appears as under the view “My flows”. Now, in order to change the flow settings you need to access the flow properties and add an additional owner (click on “Edit” in the “Owners” section)…
You can now start adding additional owners to your flow in order to ensure that ownership is no longer tied to your personal account…
Important! The result is that your flow is now turned into a “Team” flow and is no longer displayed in “My flows”. Instead it will appear in the “Teams flows” view…
OK, so this flow ownership thing is great, but there is one thing that you need to be aware about. Even though you can add multiple owners to a flow, your flow may still be using connections in context of the original user.
Example:
Your flow is configured with a connection to SharePoint / Exchange or something similar (which is very likely)…
Whatever this connections is, the connection is by default tied to the user that created the flow. And that’s also the case when adding new owners to the flow. If you add a new owner to the flow, you will also see this message…
Adding multiple users does not really solve the issue with the flow being fully functional after the original user’s termination. Why? Because the connections in the flow are no longer valid! The flow simply cannot connect to something in context of a user that no longer exists.
I cannot think of a real solution for this. The only thing I can suggest is that you ensure that the connections you create in your flows always are tied to an active Microsoft 365 account. Using some kind of system account may be the solution. But, if you create solutions that require a lot of workflow runs, you may be hitting the account’s limit of free workflow runs. Make sure you are always aligned with Microsoft’s licensing model for flows: https://emea.flow.microsoft.com/en-us/pricing/
So why even add additional owners?
Adding multiple owners to your flow is still very much recommended. By adding multiple owners you ensure that your flow continues to live, even after the original author’s termination. But make sure your flow’s connections are always active, otherwise the flow may not run the in the expected behaviour.
Ok, so you have already built several Power Automate workflows to support various business processes. And during your development, you also found the need for using conditions. You have even used several condition steps in the very beginning of your workflow to determine if you should continue the remaining processes of your workflow, or terminate it.
Did you know that, in about August, 2019, Microsoft released a new way of handling conditions in your trigger settings, that can let you skip your workflow process before the process is even started?
In this post I will give you some tips on how you can use these new trigger settings.
The “old” way
Let’s start with an old example. Just to explain how we used to do it.
In the below example we have created a Power Automate flow with a standard trigger and set a condition which checks if a certain value is true. If the condition is met, the flow should continue to run it’s actions. If not, the flow should exit immediately (terminate). This process requires about 3 actions from the flow…
The old fashion way….
Using Trigger Conditions – The new way
With Trigger Conditions you now have a new option in your trigger settings which can be used to accomplish the same as the above, but in a more simple way. The difference is that the workflow will not figure as being executed in the flow history list unless the trigger condition is met (ok, yes it will, but it will be hidden – I will explain in the bottom of this post).
Another benefit, is that when a flow is “skipped”, it will not count on your user’s limited flow run quota.
This option is now available for most of the standard Triggers in Power Automate flows.
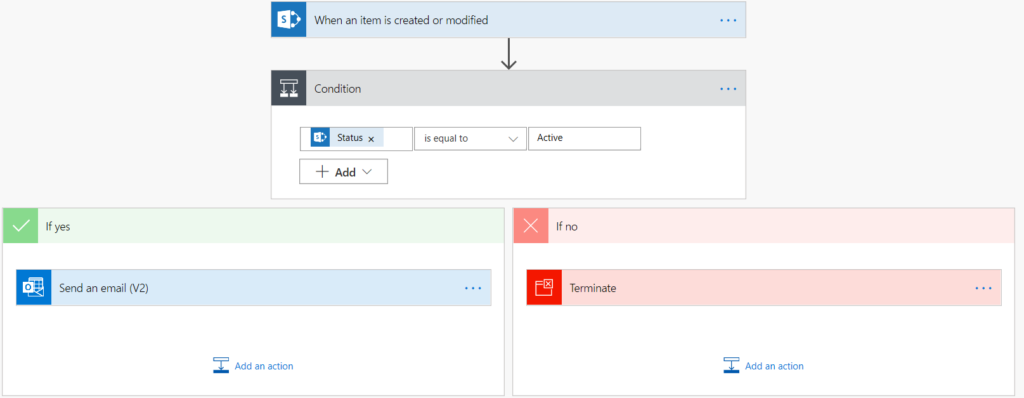
While having a new “Automated” flow created with a standard trigger (like the “When an item is created or modified”), you can now open the settings for the trigger and find the “Trigger Conditions” option…
In the below example I have configured the “Trigger Conditions” settings, so that the flow should only execute if an item’s “Status” field is set to “Active” in a SharePoint list…
The result, when executing the flow with the above settings, is that the flow will only execute if the above conditions are met (the value of the “Status” field is set to “Active”). In any other situations, the execution will be skipped.
How to find the value to insert into the trigger conditions
If you
are having a hard time figuring out how to insert the values into your trigger
conditions, the below trick can save you some pains.
Add the workflow action “Get items” and configure it to lookup items in your list (in some cases you can ignore the “Get items” step). Then add a “Filter array” action and configure it as if it was your condition…
When you are done, click on the “Filter array” action’s “Edit in advance mode” link, and there you have the result string to be used in your trigger condition…
Simply copy the above result into your Trigger Condition settings and save the configuration.
How to find skipped workflows
While using Power Automate Flows with Trigger Conditions you will evidently have situations where the flow is triggered but also ignored (skipped), because your Trigger Conditions are not met. So where can you find these skipped Flows? The answer is in the “Flow Runs” – but you need to look at the right place…
In your “Flow Runs” list view click on “All Runs”…
From the “All runs” view click on the view settings and select “Checks (no new data)” option…
You can now see the skipped flow runs.
Note! Although, you are able to see the flow’s skipped runs, you cannot see details about why the flow was skipped – this is definitely an area for improvement by Microsoft!
We use cookies to optimize our website and our service.
Functional
Always active
The technical storage or access is strictly necessary for the legitimate purpose of enabling the use of a specific service explicitly requested by the subscriber or user, or for the sole purpose of carrying out the transmission of a communication over an electronic communications network.
Preferences
The technical storage or access is necessary for the legitimate purpose of storing preferences that are not requested by the subscriber or user.
Statistics
The technical storage or access that is used exclusively for statistical purposes.The technical storage or access that is used exclusively for anonymous statistical purposes. Without a subpoena, voluntary compliance on the part of your Internet Service Provider, or additional records from a third party, information stored or retrieved for this purpose alone cannot usually be used to identify you.
Marketing
The technical storage or access is required to create user profiles to send advertising, or to track the user on a website or across several websites for similar marketing purposes.